
This document was replaced in with Building an APRS Two-Way IGate (2023) to include updates to direwolf and Debian. This document should be considered archival only and the new article should be used.
Updated: 2020-11-15 (typos, add note on use of alsamixer, add to igate script to create tmux directory for systems that don’t have it automatically)
Recently WW8TF-15 was upgraded and reconfigured to be a two-way APRS IGate. Here’s how to build an easy two-way APRS IGate with existing or easily obtainable parts. Here is what you need:
- 2m FM analog radio with a TNC port
- A CM108-based USB audio adapter (WW8TF recommends the Masters Communications RA-25)
- A Raspberry Pi running Raspbian (recommended Pi3B or better)
- A cable to connect the TNC port to the USB audio adapter (likely this is a homebrew affair)
Virtually any FM analog radio will work for this setup if quality audio is accessible. It is possible to use the external speaker and hand mic ports of any radio but tuning the audio is trickier and some receive messages might be lost. The best radio is one with a TNC port that supports “9600 bps” audio (even though 9600 isn’t needed – that just deals with audio filtering).
This document assumes that you can build the cable to connect the radio and the audio board. It also assumes that you know how to (or can follow other directions to) install Raspberry Pi OS.
Getting Started
To get started, connect the radio to the USB audio adapter with a custom cable. Connect the audio adapter then to the Pi. Install the latest version of Raspberry Pi OS (currently based on Debian Buster). If you are comfortable with the command line, only install the “lite” image to keep the size down and reduce resource use on the SD card. Make sure you can SSH to the Pi from your network.
Installing Direwolf
Install Direwolf from the official Github repository. The Debian-based package of Direwolf, at least of this writing, is old and does not support the CM108 audio chip with GPIO which is necessary to key the PTT. Direwolf v1.5 or greater is needed. If Debian starts providing the newer Direwolf, then the installable package should work fine.
For new installs of Raspberry Pi OS, you will need to make sure all of the needed compile tools and libraries are available:
# apt install -y git gcc g++ make cmake libasound2-dev libudev-dev
Download the latest released version of Direwolf from the Releases tab of Git Hub to your Pi. Uncompress it and cd into the source code. This example uses Direwolf v1.6 which changed its build process from 1.5 and earlier. Build Direwolf doing the following:
# pwd
/home/pi/direwolf-1.6
# mkdir build && cd build
# cmake ..
-- The C compiler identification is GNU 8.3.0
-- The CXX compiler identification is GNU 8.3.0
[..... omitted for brevity .....]
-- Configuring done
-- Generating done
-- Build files have been written to: /home/pi/direwolf-1.6/build
# make
[..... standard build output .....]
# make install
[..... standard install output .....]
# which direwolf
/usr/local/bin/direwolf
The installation of Direwolf is complete.
Configuring Direwolf as an IGate
Determine which USB audio device the CM108 is connected as using the cm108 command provided by Direwolf. Note the “plughw” identifier for configuration with Direwolf. For example:
# cm108 | grep plughw
** 0d8c 013a USB PnP Sound Device /dev/snd/pcmC1D0c plughw:1,0 plughw:Device,0 /dev/hidraw0
** 0d8c 013a USB PnP Sound Device /dev/snd/pcmC1D0p plughw:1,0 plughw:Device,0 /dev/hidraw0
In the above example, the CM108 sound device is plughw:1,0.
Now, create a file named /etc/igate.conf that looks something like the following:
# Audio Device
ADEVICE plughw:1,0
ACHANNELS 1
CHANNEL 0

# APRS Callsign/SSID
MYCALL >>CALLSIGN HERE<<

# Modem Mode
MODEM 1200
PTT CM108

# Server Configuration
AGWPORT 8000
KISSPORT 8001

# IGate Information
IGSERVER noam.aprs2.net
IGLOGIN >>CALLSIGN HERE<< >>PASSCODE HERE<<
IGTXVIA 0 WIDE1-1,WIDE2-1

# Filter repeating of IGate-receved messages to only
# "message" type objects originating within a 50km radius
IGFILTER m/50
IGTXLIMIT 6 10
In the above basic configuration, the following items need to be changed.
In both places where “>>CALLSIGN HERE<<” appears, replace that with the callsign/SSID of the station. In general, following APRS conventions, this will be the callsign followed by a -10. If -10 is already in use, then use -15. It is written as, using WW8TF as an example, “WW8TF-10”.
Where “>>PASSCODE HERE<<” appears, replace that with your APRS Passcode. This is simply a derived value from the station callsign. Use this site to generate the code.
Finally, if the station is not in North America, change the IGSERVER parameter to be the regional IGate Tier 2 server:
- noam.aprs2.net – for North America
- soam.aprs2.net – for South America
- euro.aprs2.net – for Europe and Africa
- asia.aprs2.net – for Asia
- aunz.aprs2.net – for Oceania
The last step is to announce your IGate location into the APRS system. This is done with the PBEACON command. Create one beacon for the IG destination (i.e. the Internet) and one for your local RF transmission.
The format for the RF PBEACON is as follows:
PBEACON delay=1 every=60 symbol=\# overlay=I lat=41.05749 long=-81.68424 power=10 height=20 gain=4 comment="WW8TF-15 iGate Norton OH" via=WIDE1-1,WIDE2-1
The format for the IG PBEACONS is as follows:
PBEACON delay=1 every=60 symbol=\# overlay=I lat=41.05749 long=-81.68424 power=10 height=20 gain=4 comment="WW8TF-15 iGate Norton OH - ww8tf.club" sendto=IG
Note that the difference between the two is the sendto= and via= parameters. By default, the sendto= is “0” which means the first RF audio channel. By setting sendto= to “IG”, that specifies that Direwolf sends the beacon out to the Internet rather than towards the digipeaters. The via= parameter for RF transmissions specify the APRS path to take. You can read a good write up on how APRS WIDE paths work but it’s outside the scope of this tutorial. A safe default is “WIDE1-1,WIDE2-1”. The PBEACON command will always use the callsign specified in the MYCALL configuration item.
Set the proper lat= and long= values for the location of your IGate and set the comment= value to something meaningful about your site/station.
Include these commands in your /etc/igate.conf file.
Testing the Direwolf IGate
Now, from the shell, start a direwolf instance using the /etc/igate.conf configuration file. You should see output something like the following:
# direwolf -t 0 -c /etc/igate.conf
Dire Wolf version 1.6
Includes optional support for: cm108-ptt
Reading config file /etc/igate.conf
Audio device for both receive and transmit: plughw:1,0 (channel 0)
Channel 0: 1200 baud, AFSK 1200 & 2200 Hz, E+, 44100 sample rate / 3.
Using /dev/hidraw0 GPIO 3 for channel 0 PTT control.
Ready to accept AGW client application 0 on port 8000 …
Ready to accept KISS TCP client application 0 on port 8001 …
Now connected to IGate server noam.aprs2.net (44.24.241.98)
Check server status here http://44.24.241.98:14501
[ig] # aprsc 2.1.4-g408ed49
[ig] # logresp WW8TF-15 verified, server T2USANW
If everything was setup properly, there will be no reported errors and then after a few seconds you will get a statement similar to “logresp WW8TF-15 verified, server T2USANW”. This means the system is operating and has connected to the Tier2 IGate service. The callsign and server will be different based on the configuration.
Watching the output further, after the delay= time in your PBEACON command the position reporting of the station should be seen.
[ig] WW8TF-15>APDW16:!4103.45NI08141.05W#WW8TF-15 iGate Norton OH - ww8tf.club

[0L] WW8TF-15>APDW16,WIDE1-1,WIDE2-1:!4103.45NI08141.05W#PHG3140WW8TF-15 iGate Norton OH
Note the output here is in the AX.25/APRS packet format so the lat/long will be in a different form. Wait a few minutes and then look for the station at aprs.fi. Use the complete SSID for searching – e.g. “WW8TF-15”. It will appear on the map. Verify the location and then click the small Info link to see the complete station information.
When done testing, press CTRL+c to end the process.
Audio Tuning
With Direwolf running as configured above, open a second terminal session to the Pi. In the first session, look for lines similar to this:
Digipeater WOOSTR audio level = 49(19/22) [NONE] |||||__
Digipeater AKRON audio level = 68(16/22) [NONE] |||__
Digipeater K8UI-5 audio level = 14(12/11) [NONE] |||||__
This is showing the relative audio signal level from the radio for received stations. Tuning the audio is tricky. As with any audio, the setup shouldn’t overdrive the audio of loud stations but not be too quiet as weak stations aren’t heard. There is no prescription for this, it requires tuning, testing, and patience.
There is also adjustments for the transmit audio. This can be even trickier and is best done with a friend who can listen to the audio from the signal at a distance.
Use the alsamixer command to adjust the input audio levels. Run alsamixer and press F6 to select the “USB PnP Sound Device”. A screen like this appears:
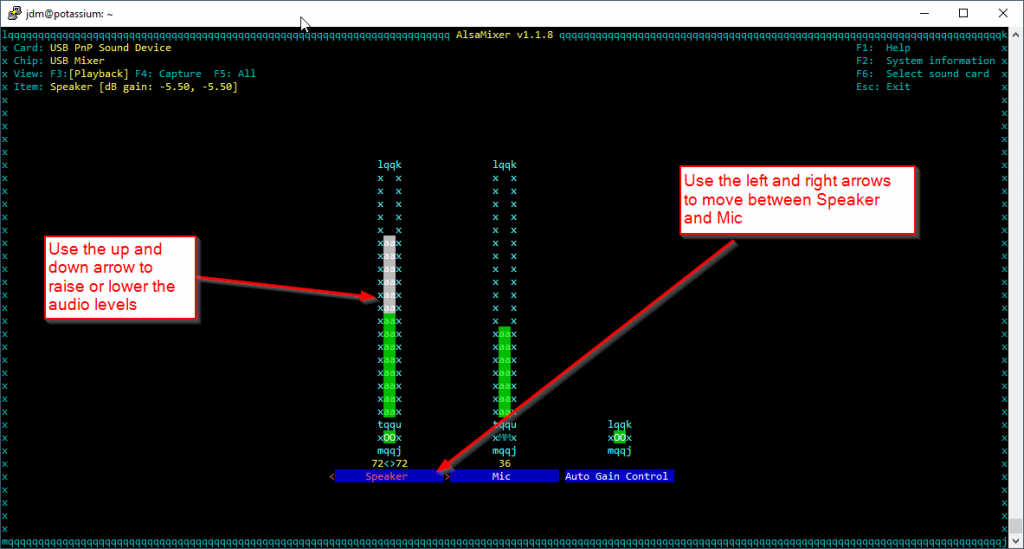
The left/right arrows will move between the Speaker and Mic. The up/down arrows change the level. The level changing is “live” so no restarting of any process is necessary. Keep in mind that alsamixer is showing the “reverse” from what one would normally expect when talking about a radio audio loudness. The “mic” is the level of audio that Direwolf is hearing and “speaker” is the amount Direwolf is sending. For the DMK URIx, disable (“mute”) the Auto Gain Control or else the APRS signals will be distorted.
When the levels are good, or they are at a place for some long-term testing, press Esc to exit alsamixer. Changes are not persistent across reboots unless saved. To save the configuration use the command ‘alsactl store 1’ where “1” is the device ID discovered previously i.e. the plughw:1,0 item (note the emphasized 1 here).
alsactl store 1
Creating a Persistent Service
Running Direwolf on a Pi long-term brings questions of SDCard wear into consideration. Direwolf is, by its function, a noisy process. This is great for debugging and understanding, but terrible for all of the writes to an SDCard this generates. The best way to straddle this divide is to run Direwolf within a tmux instance. Tmux is a terminal multiplexer that runs a process as a “service” that other terminals can connect to. This is a newer and more flexible version of the venerable screen application. Understanding tmux is far outside the scope of this documentation so just trust these directions.
Install tmux with apt install -y tmux. Create the file /usr/local/sbin/igate with the following contents:
#!/bin/bash
test ! -d /var/lib/tmux && mkdir -p /var/lib/tmux
chmod 755 /var/lib/tmux
chmod o+w /var/lib/tmux/igate
exec direwolf -t 0 -c /etc/igate.conf
Mark the file as executable with chmod 755 /usr/local/sbin/igate.
Create the file /usr/local/bin/igate-console with the following contents:
#!/bin/bash
exec /usr/bin/tmux -S /var/lib/tmux/igate attach -r
Mark the file as executable with chmod 755 /usr/local/bin/igate-console.
Now a systemd service for startup is needed to run the service. Create the file /etc/systemd/system/igate.service with the following contents:
[Unit]
Description=APRS iGate using Direwolf
Documentation=man:direwolf
After=network.target
AssertPathExists=/etc/igate.conf

[Service]
ExecStart=/usr/bin/tmux -S /var/lib/tmux/igate new-session -d -s igate /usr/local/sbin/igate
ExecStop=/usr/bin/tmux -S /var/lib/tmux/igate kill-server
RemainAfterExit=yes

[Install]
WantedBy=multi-user.target
This enables a systemd target named “igate” that can be used in the normal fashion. Setup and start the service:
# systemctl daemon-reload
# systemctl enable igate
# systemctl start igate
In /var/log/daemon.log an entry that the service started successfully appears:
Nov 2 14:48:11 potassium systemd[1]: Started APRS iGate using Direwolf.
Now attach to the console with the command igate-console. A tmux console session should appear that looks something like:
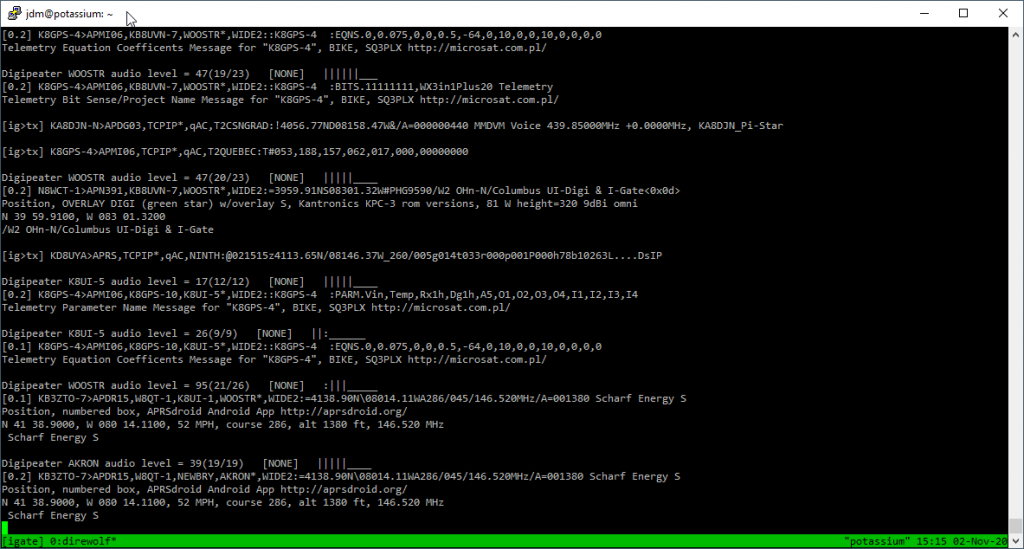
This will show the output of the Direwolf service. Many interesting things for both observation and tuning can be found here so it’s valuable to watch from time to time.
To exit the console press CTRL+b then d:
# igate-console
[detached (from session igate)]
The service will still be running in the background.
Digipeating
In general, the best strategy for coverage is to use the IGate station from a lower-profile location to talk to high-profile digipeaters using all-hardware implementations such as a radio + TNC. This saves on Internet connectivity issues, enhances configuration access of the IGate, and the robustness of the digipeaters.
If the new station is not in an area where there is good digipeater coverage or the station is going to be a high-profile station, then after confirming everything is working properly, enable the digipeating function of Direwolf. A safe starting command in /etc/igate.conf would be:
DIGIPEAT 0 0 ^WIDE[3-7]-[1-7]$|^TEST$ ^WIDE[12]-[12]$ TRACE
After adding, restart the service with systemctl restart igate. See the Direwolf User Guide for lots of explanation on how to use the DIGIPEAT command and its associated FILTER command.
RF Power Considerations
Hams are always encouraged to use the least amount of power necessary to make a contact as a matter of course. However in FM, this is often not carefully followed due to lots of mobile use of various repeaters at various distances. However with APRS, care needs to be taken not to be too
“loud” depending on the area. If there are a number of high profile digipeaters in the area, use only the power level necessary to contact the closest ones. APRS is all simplex communication. Too many loud signals can corrupt and collide causing APRS coverage issues.
In the WTF service area, the WW8TF-15 IGate operates at 10W which is sufficient to hit all three of our main Digipeaters in Akron, Rittman, and Wooster from Norton.
Conclusion
This is only a jumpstart guide to getting started with deploying a two-way IGate and there are tons of topics to consider for building one. The Direwolf userguide is an excellent resource.


