
As faithful readers of the (very occasional) posts to this site, there is a series on modifying and using the Yaesu DR-1X repeaters. One of the latest hacks that’s been done to one is the use of a D2A board and PiTone to inject the needed CTCSS tone into the DR-1X with a remote audio source. This works with any radio that takes CTCSS in on a separate pin but the example will use the DR-1X.
Note: The DR-1X cannot mix CTCSS (or DCS) into the audio when it’s being created and transmitted from an external controller (or other source – e.g. Allstar). The DR-1X requires that an external CTCSS or DCS source be injected into the transmission on pin 6.
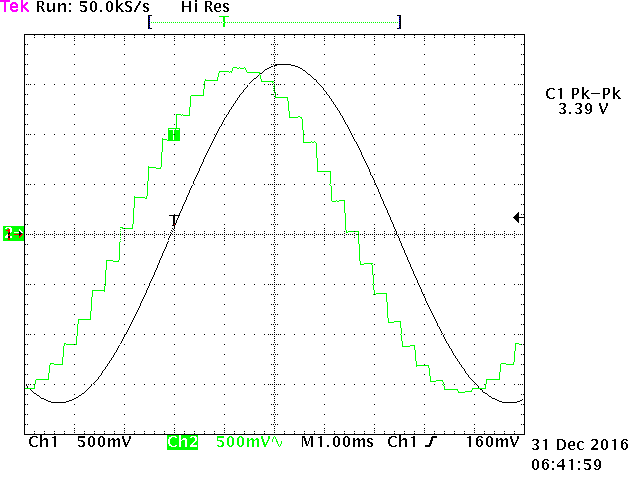
PiTone was created by Hamprojects Developers K8UT and N8AR to generate CTCSS codes by stimulating a digital to analog chip using a Raspberry Pi’s I2C pins on the GPIO header. The supported chip is the MCP4725 DAC which is a common digital to analog converters. The full manual to build and install PiTone can be found here. The Hamprojects guys determined that using a DAC with 32 steps creates enough of a valid CTCSS wave that it works as an inexpensive CTCSS tone generator.
The MCP4725 DAC chip needs to be powered and have the digital signals connected to the Pi. The pinout for the standard Pi GPIO pins is as follows:
Pi GPIO                  MCP4725
-----------------------------------------
3V3 Power     Pin 1 ---> VCC
GPIO 2 (SDA)  Pin 2 ---> SDA
GPIO 3 (SCL)  Pin 3 ---> SCL
GND           Pin 6 ---> GND (next to VCC)
Wire the OUT and it’s paired GND into your repeater (e.g. for a DR-1X to pin 6 and pin 5/10 respectively) for the analog wave out.
To use PiTone to inject CTCSS from HamVOIP Allstar, here are the basic steps.
1. From the root shell of HamVOIP, install the i2c-tools and lm_sensors packages:
# pacman -S i2c-tools lm_sensors
2. Edit /boot/config.txt and add the following lines at the bottom of the file:
dtparam=i2c_arm=on
dtparam=i2c_baudrate=1200000
After adding these lines, you must reboot the Pi with ‘reboot’.
3. Download pitone_30_release.zip to the Pi and uncompress its contents to /opt/pitone:
# mkdir -p /opt/pitone
# cd /opt/pitone
# unzip /root/pitone_30_release.zip
4. Determine the address of your DAC on the I2C bus. For a standard Pi, it is most likely 60. This can be determined by using i2cdetect:
# i2cdetect -y 1
     0  1  2  3  4  5  6  7  8  9  a  b  c  d  e  f
00:          -- -- -- -- -- -- -- -- -- -- -- -- --
10: -- -- -- -- -- -- -- -- -- -- -- -- -- -- -- --
20: -- -- -- -- -- -- -- -- -- -- -- -- -- -- -- --
30: -- -- -- -- -- -- -- -- -- -- -- -- -- -- -- --
40: -- -- -- -- -- -- -- -- -- -- -- -- -- -- -- --
50: -- -- -- -- -- -- -- -- -- -- -- -- -- -- -- --
60: 60 -- -- -- -- -- -- -- -- -- -- -- -- -- -- --
70: -- -- -- -- -- -- -- --
In the above example, there is only one I2C device connected located at address 60. This is the most common Pi address. This is used in the i2cAddress parameter in the next step.
5. Edit /opt/pitone/pitone.ini and set the variables plTone, stepCount, percentVolts, and i2cAddress. For plTone, enter the desired CTCSS tone frequency in the format NNN.N without any leading zero (e.g. 88.5, 110.9, 131.8, etc.). For stepCount, set 32. For percentVolts, the correct value will be based on the repeater being used. For example, a DR-1X seems to like 20. Adjust percenetVolts for the strongest signal without introducing a buzz into the audio. The variable i2cAddress should be set to the value discovered above.
plTone = 110.9
stepCount = 32
percentVolts = 20
i2cAddress = 60
Save the file and edit it.
6. Mark the pitone_v30 file executable:
chmod 755 /opt/pitone/pitone_v30
7. Create a systemd service file to launch the pitone service on boot. Create the following in /etc/systemd/system/pitone.service:
[Unit]
Description=PiTone CTCSS Generator

[Service]
Type=simple
User=root
Group=root
WorkingDirectory=/opt/pitone
ExecStart=/opt/pitone/pitone_v30
Restart=on-abnormal

[Install]
WantedBy=multi-user.target
8. Enable and start the pitone service:
# systemctl enable pitone
# systemctl start pitone
If everything worked properly, your DAC chip should be merrily creating a CTCSS tone output. See the manual for troubleshooting if you have to do some fiddling or have problems. The manual is comprehensive and well-written.


