
This is the third in a series of three planned articles discussing the modification of Yaesu DR-1X repeaters for solid, link-ready analog FM or as a multi-mode digital voice repeater. The planned articles are:
- Yaesu DR-1X Repeater Modifications: Common Concerns
- DR-1X Repeater Mods for Analog + Allstar
- DR-1X Repeater Mods for Digital Voice
Introduction
This article outlines how to convert a Yaesu DR-1X repeater to a multi-mode digital repeater. If you haven’t read it yet, please read Yaesu DR-1X Repeater Modification: Common Concerns first. It contains important information to understand before undertaking a conversion.
Also, this document assumes general familiarity with Pi-STAR and doesn’t go into detailed Pi-STAR configuration. For help with Pi-STAR setup see W1MSG’s YouTube Video.
As stated in the “Common Concerns” post, make sure you have an original, non-factory-refurbished Yaesu DR-1X. The refurb versions and the DR-2X have updated internals that will mangle the signal of digital modes rendering them unusable.
Parts List
To convert a DR-1X to a multi-mode digital setup, the following parts are needed:
| Part | URL | Cost | Notes |
|---|---|---|---|
| Raspberry Pi 3B Kit: Raspberry Pi 3B Heatsinks Power Supply Comes with a case but you don’t need it. | https://amazon.com/dp/B01C6EQNNK | $50 | Note: Until Pi-STAR v4 is out, only the beta versions of Pi-STAR can support Raspberry Pi 4 hardware. |
| Samsung EVO Select 32GB MicroSDXC | https://amazon.com/dp/B06XWN9Q99 | $6.50 | Note: Get this exact card; don’t cheap out on this or use one you already have |
| Repeater-Builder STM32DVM Multi-Mode Modem STM32_DVM_PiHat | http://www.repeater-builder.com/products/stm32-dvm.html | $85 + Shipping | |
| Repeater-Builder STM32-DVM Pi Case STM32_DVM_PiCase | http://www.repeater-builder.com/products/stm32-dvm.html | $5 + Shipping | |
| TOTAL | $146.50 + tax + shipping |
Notes on the Repeater Builder Controller Cable
Repeater-builder.com also sells a pre-made DR-1X duplex cable for use with the STM32-DVM PiHat. However the cable is built with an interesting concept in mind. The Repeater Builder-made controller cable is designed to keep the analog function of the DR-1X repeater operable. When using the RB cable, if the DR-1X successfully decodes a CTCSS or DCS tone, the CTCSS detection line pulls low and disables the STM32_DVM via RXSQ on pin 3 of the Pihat. Similarly, the DR-1X pin 1 is tied to PTT so that the DR-1X will only operate in Remote Control mode when the STM32_DVM is triggering PTT.
This situation leads to some interesting considerations. If the goal is to provide all-digital services, when using the RB stock cable you MUST set an obscure DCS code on the DR-1X so that the repeater will never (practically speaking) decode a successful analog FM transmission. This is generally the solution if you don’t want to build your own cable.
If you are thinking about supporting dual analog and digital mode, keep in mind that a successfully-decoded CTCSS or DCS analog FM signal will always “win” – there is no way to preserve a digital QSO in progress because the DR-1X and Pi-STAR cannot know about each others’ current state.
WTF recommends making the repeater digital only and building your own cable. The directions from here on out are assuming a pure-digital design.
The DR-1X’s external controller port is a D-Sub DE-15 socket and the DVM port is a D-Sub DB-9 socket. Purchase the corresponding male adapters from Amazon or your preferred parts vendor.
Then, make a cable according to the following pinout:
| DR-1X Pin | DR-1X Pin Name | Connect to Pin(s) | Pin(s) Function(s) |
|---|---|---|---|
| 1 | Local/Remote Mode | DR-1X Pin 5 | Pull to ground to enable remote controller mode |
| 2 | PTT IN | STM32-DVM Pin 5 | PTT (active low) |
| 5 | Ground | STM32-DVM Pin 8 | Ground DR-1X Pins 1, 5, 10, 11 must all tie together for common ground logic setup to enable remote controller mode locked into FM Analog |
| 7 | Transmit Audio In | STM32-DVM Pin 2 | Audio out from STM32-DVM modem to DR-1X |
| 8 | Discriminator Audit Out | STM32-DVM Pin 6 | Audio from DR-1X to the STM32-DVM |
| 10 | Ground | DR-1X Pin 5 | Ground |
| 11 | Ext Logic Port 1 | DR-1X Pin 5 | Note: This pin must be pulled to ground so that the logic of 11 low + 12 high locks the DR-1X into FM Analog mode |
| 12 | Ext Logic Port 2 | NONE | Note: This pin must be left to float so that the logic of 11 low + 12 high locks the DR-1X into FM Analog mode |
Pi-STAR
Assemble the Raspberry Pi kit, place the STM32-DVM PiHat on the Pi, and put them in the case. Write the Pi-STAR image to the SD card and put it into the Pi. Follow the regular setup instructions for Pi-STAR with the following specific configuration:
Control Software under “Configuration”

General Configuration under “Configuration”
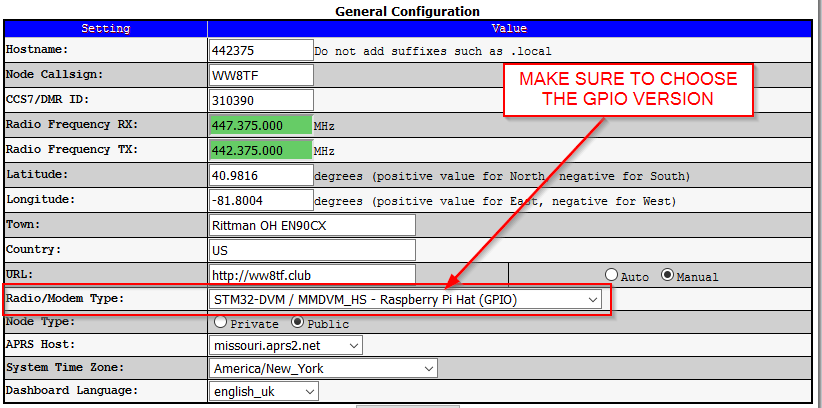
Set TXInvert and RXInvert under “Expert”
From the Configuration screen, click Expert and then MMDVMHost. Scroll down to the Modem configuration section and set TXInvert=1

For the DR-1X, when receiving 2m VHF RXInvert should be off (0). When receiving 70cm UHF, RXInvert must be on (1).

DR-1X Setup
Before plugging in the external controller cable, set the transmit and received frequencies. Then additionally set the following:
Ensure Packet Speed Is Set to 9600
Follow the directions on the page Yaesu DR-1X Repeater Modification: Common Concerns under Packet Speed Setting. Make sure the Packet Speed is set to 9600bps. This is important to bypass the DSP module in the DR-1X.
Ensure the DR-1X is in Wide Deviation Mode
If your DR-1X supports a toggle button on the second Configuration panel, make sure that the Deviation = WIDE mode is selected. Not all DR-1X firmware versions allow selecting this. See Firmware Updates in Yaesu DR-1X Repeater Modification: Common Concerns for how to make sure your repeater is running a firmware with Wide Deviation mode.
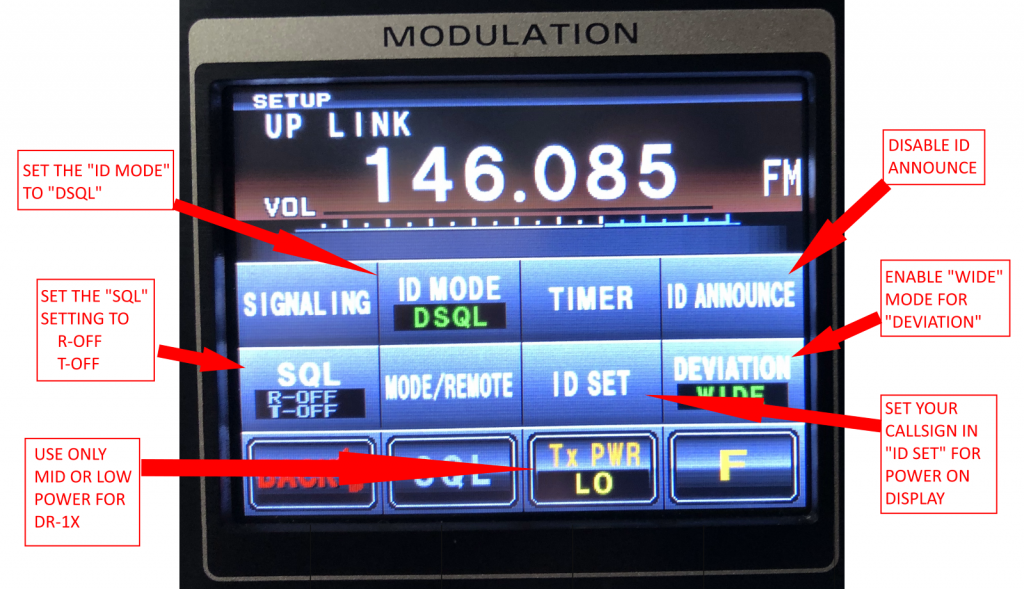
Other Settings
- Make sure that Tone and Tone Squelch are disabled
- Make sure that the ID function is OFF – Pi-STAR takes care of the ID for you
- Make sure that there’s no YSF DG_ID set – set it to “DSQL”
- Choose Lo or Mid power – do not use High power – the DR-1X cannot take that transmit level long
Connecting It All Together
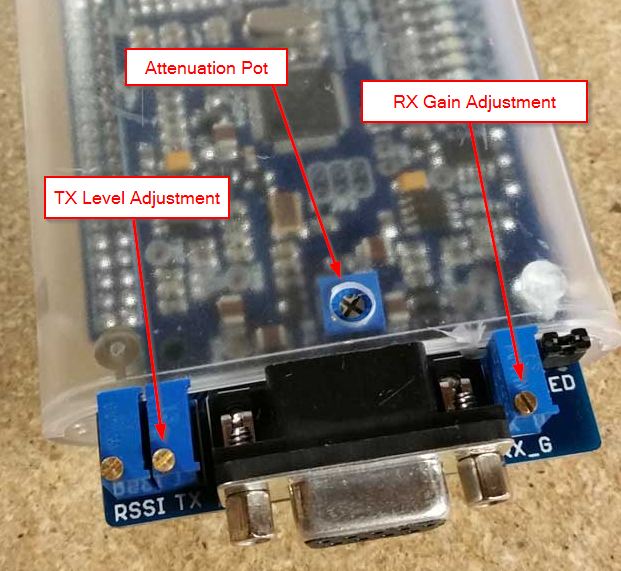
Now connect everything together. Once connected, you will need to tune the STM32-DVM Pi-Hat.
Receive Signal Tuning
This video by W1MSG describes adjusting the receive audio pots succinctly. To get right to the point, watch between 0:55 and 3:05.
General Transmit Signal Tuning
For best results, use the built-in calibration routine with a service monitor to properly set the deviation in the transmit signal. Here’s the basic overview of the process:
- SSH to the Pi-STAR as the ‘pi-star’ user
- Become root with ‘sudo -s‘
- Run /usr/local/sbin/pistar-mmdvmcal
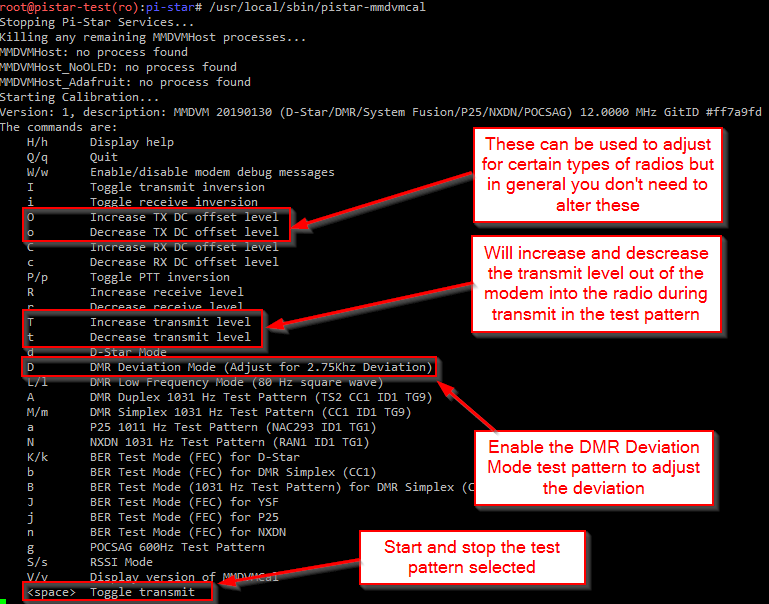
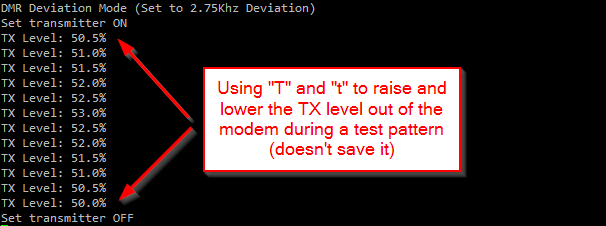
- From the menu, press D and then <SPACE> to begin the transmission of a DMR calibration pattern. Note that this is NOT for DMR mode only – even if you aren’t planning to use or support DMR this is the name of the mode to transmit a test signal for calibration.
- While the Pi-STAR is transmitting, watch the signal on the service monitor and adjust the TX pot on the PiHat until the signal deviation is at 2.75 KHz

- Once adjusted, press <SPACE> to turn off the transmitter and Q to exit the calibration. Pi-STAR services will restart.
Fine Adjustments to Transmit Audio Tuning
Each mode behaves differently and the MMDVMHost configuration of Pi-STAR has fine-grained controls to adjust each one differently.
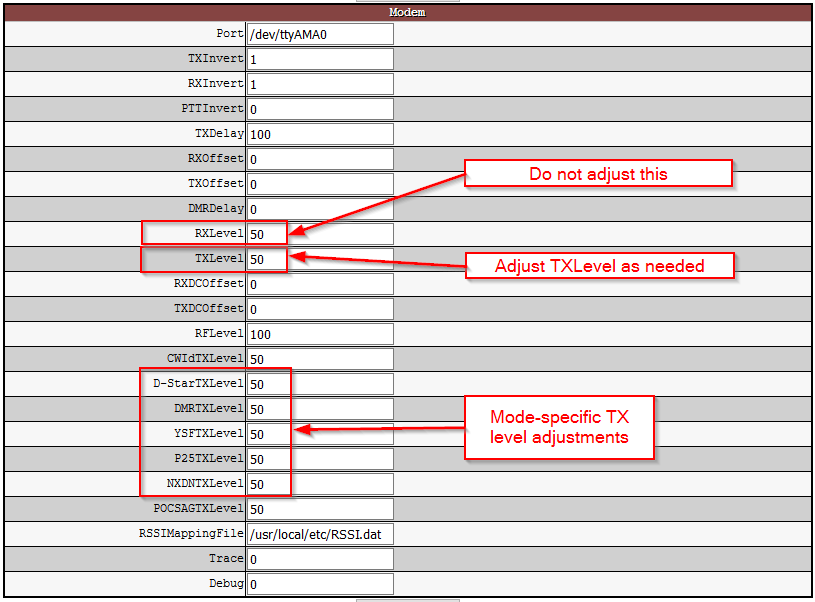
Under the Expert -> MMDVMHost settings adjust the following:
- RXLevel – general receive audio level. In general, leave this at 50 unless you have a lot of decode problems. Use this setting only if you can’t quite tune out the decode problems using the method above.
- TXLevel – general transmit audio level. Turn this for the mode that you expect to get the most use on your repeater. All radios behave differently and some modest experimentation may be needed to support a diverse set of radios. Over-transmitting or under-transmitting can cause radios not to properly decode. “Big name” radios such as Icom, Yaesu, Kenwood, and Motorola appear to be more forgiving of this level if it’s over-driven. The “value” DMR radios have the most problems. With a service monitor, you can use the pistar-mmdvmcal program to test this setting during the test pattern transmission (see options T/t).
- D-StarTXLevel, DMRTXLevel, YSFTXLevel, P25TXLevel, and NXDNTXLevel are additional transmit adjustments for each mode.
Conclusion
After these steps are followed, the DR-1X + Pi-STAR stack is ready to go. Begin customizing your Pi-STAR configuration based on your needs and start getting people using the system!


