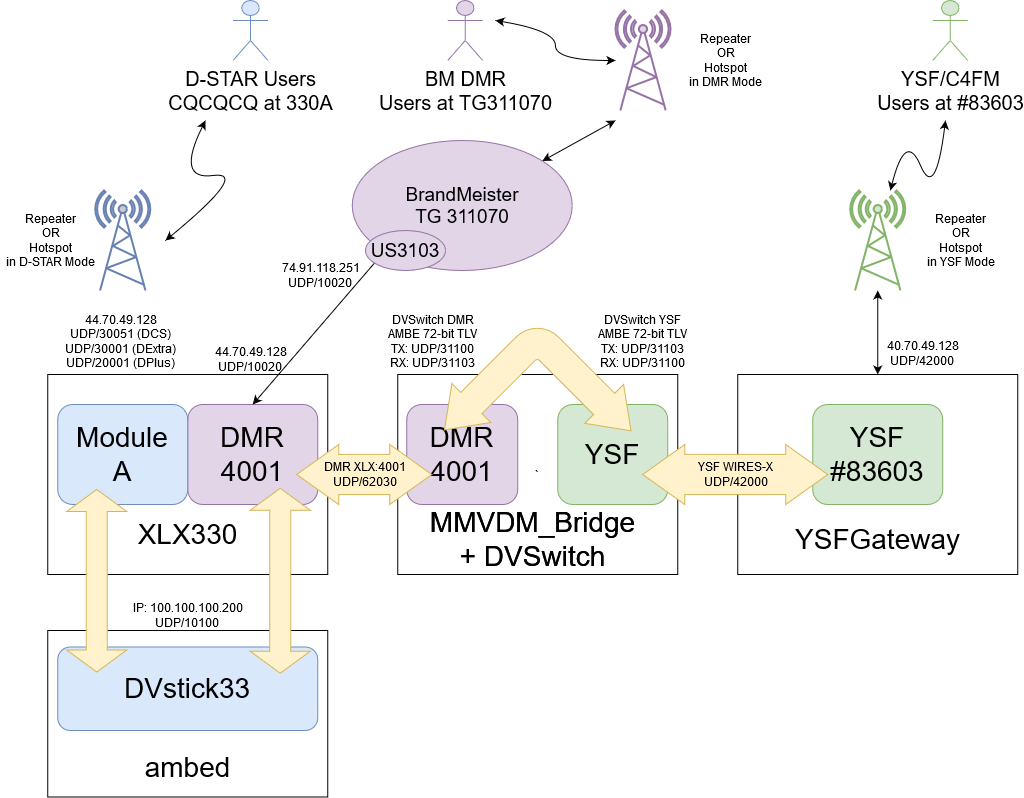
Back in March, the build and configuration of the XLX330 reflector was discussed in depth. Since then, to keep costs down (i.e. more AMBE dongles), we’ve made some small adjustments.
We decided to add transcoding with Brandmeister DMR due to the surge in interest in the Wooster area in DMR. That lead to some interesting exhaustion problems with the DVStick33 AMBE dongle. I found out that ambed will only initialize decoders in pairs. So the DVStick33 having three channels can’t be efficiently used by ambed. So we decided to get creative.
It’s interesting to note that the encoded audio for DMR and YSF is using the same fundamental AMBE audio stream. The difference is the metadata surrounding the stream. There are a variety of tools that provide for “transcoding” between DMR and YSF. Rather than doing real audio transcoding, what they do is strip off the metadata of one mode (e.g. DMR) and then reapply the metadata of another (e.g. YSF). This is most commonly seen with the DMR2YSF and YSF2DMR gateway programs.
After doing some investigation, we decided to adopt a more flexible stack of software to anticipate future growth. One of the main products in this space is the DVSwitch toolchain and we decided to use the mmdvm_bridge application from that toolchain. mmdvm_bridge operates basically as, well, a bridge to connect a variety of protocols.
Since one of the easiest ways to get a tie into the Brandmeister Network is to run a full-fledged DMR system to interlink (like xlxd) and we already had the interlink to the BM US 3103 server. So the plan was to move YSF off of the xlxd process itself to a standalone YSFReflector process and then connect the two with mmdvm_bridge. Here’s a diagram of how to set it all up.

First, to make things work, you have to recompile xlxd to change the port of YSF so you can run UDP/42000 on the same IP. You can do this fairly easily by editing main.h of xlxd around line 120:
//YSF
#define YSF_PORT          42222
In our case, I changed port 40000 to unused port 42222 so there is no port collision. After compiling and installing the new xlxd and restarting it, UDP/42000 is now free. Installing YSFGateway is very simple. I even contributed code to the project to allow it to bind to a particular IP address rather than listening to all of them. The XLX330 IP address is actually anycasted for transportability and resiliency. YSFReflector is part of the g4klx/YSFClients GitHub package. Download or clone the repo but what’s important is the YSFGateway program.
After downloading, build the YSFGateway program:
$ cd YSFGateway
$ make
Now, copy YSFReflector to /usr/local/bin. Create a configuration file /etc/YSFReflector.ini with the following:
[General]
Daemon=0

[Info]
Id=83603
Name=XLX330
Description="Megalink 330"

[Log]
Logging levels, 0=No logging
DisplayLevel=1
FileLevel=1
FilePath=/var/log/mmdvm
FileRoot=YSFReflector

[Network]
Port=42000
Debug=0
In the example above, adjust everything in the [Info] section to match your YSFReflector information. If you have multiple IP addresses and you only want YSF running on one of them, you can use the configuration directive:
BindAddress=44.70.49.128
to cause YSFReflector to listen only on that IP. Now, create the file /etc/systemd/system/ysfreflector.service with the following contents:
[Unit]
Description=YSFReflector C4FM Service
After=network.target
Before=mmdvm_modem.service

[Service]
Type=simple
ExecStart=/usr/local/bin/YSFReflector /etc/YSFReflector.ini
ExecStop=/bin/kill -s QUIT $MAINPID
PrivateTmp=true

[Install]
WantedBy=multi-user.target
Now enable and start the process:
# systemctl daemon-reload
# systemctl enable ysfreflector
# systemctl start ysfreflector
Then tie them together with mmdvm_bridge. mmdvm_bridge is provided as part of the Debian 10 installation as the mmdvm-bridge package. Install it using apt (apt install mmdvm-bridge). Then configure the following sections in /opt/MMDVM_Bridge/MMDVM_Bridge.ini. The following are scattered throughout the file – leave everything else as the default without removing it!
[General]
Callsign=WW8TF
Id=311442
Timeout=180
Duplex=0

...

[DMR]
Enable=1
ColorCode=1
EmbeddedLCOnly=1
DumpTAData=0

[System Fusion]
Enable=1

...

[DMR Network]
Enable=1
Address=44.70.49.128
Port=62030
Jitter=360
Local=62032
Password=passw0rd
for DMR+ see https://github.com/DVSwitch/MMDVM_Bridge/blob/master/DOC/DMRplus_startup_options.md
for XLX the syntax is: Options=XLX:4009
Options="XLX:4001"
Slot1=0
Slot2=1
Debug=0

...

[System Fusion Network]
Enable=1
LocalAddress=0
LocalPort=3200
GatewayAddress=44.70.49.128
GatewayPort=42000
Debug=0
In the above configuration, change the callsign, DMR ID, and IP Address to be the correct information for the site. Now edit the following sections /opt/MMDVM_Bridge/DVSwitch.ini as follows, leaving everything else the default:
[DMR]
Address = 127.0.0.1 ; Address to send AMBE TLV frames to (export)
TXPort = 31100 ; Port to send AMBE TLV frames to (export)
RXPort = 31103 ; Port to listen on (import)
Slot = 2 ; Export slot
ExportTG = 0 ; Which TG to export
TalkerAlias = WW8TF via DVSwitch

[YSF]
Address = 127.0.0.1 ; Address to send AMBE TLV frames to (export)
TXPort = 31103 ; Port to send AMBE TLV frames to (export)
RXPort = 31100 ; Port to listen on (import)
TXWidePort = 35105 ; Port to send IMBE TLV frames to for YSFw (export)
FallbackID = 311442 ; In case we can not find a valid DMR id in the database, export this one
ExportTG = 311070 ; Which TG to export
Slot = 2 ; Export slot
Note again, you will need to update the system-specific items of TalkerAlias, ExportTG, and FallbackID. Finally, enable the service:
# systemctl enable mmdvm-bridge
# systemctl start mmdvm-bridge
One final note on mmdvm_bridge. At the time of writing (August 2020), the mmdvm-bridge package on Debian has not been updated to reflect recent changes to the RadioID service for DMR IDs. To fix this and enable the proper downloading of the DMR IDs, edit /opt/MMDVM_Bridge/dvswitch.sh and on line 756 change all three URLs to start with https://database.radioid.net. The nightly cron job will not work without fixing these.
And that’s pretty much it. You should now be able to use all modes, with YSF/C4FM via the YSFGateway/MMDVM stack.


